
A preventive maintenance checklist is the cheapest reliability tool on the floor, and the most commonly ignored. Most plants own one somewhere: a laminated card taped to a machine, a spreadsheet a retired supervisor built, or a tab inside a CMMS nobody opens. The list exists. What’s missing is the discipline to run it, and a structure clear enough that a new technician can pick it up and know exactly what to check, how often, and what “good” looks like.
That gap is expensive. Siemens put the cost of unplanned downtime at roughly $1.4 trillion a year for the world’s 500 largest companies, about 11% of turnover. The US Department of Energy’s maintenance guidance is blunter about the upside, putting the savings from a functioning preventive program at 12% to 18% on average over running equipment to failure. This guide gives you a preventive maintenance checklist organized the way work actually happens, by frequency, plus a free template and a method to build your own for your equipment instead of borrowing a generic one that doesn’t fit.
Direct answer — What is a preventive maintenance checklist?
A preventive maintenance checklist is a standardized list of routine tasks (inspections, cleaning, lubrication, adjustments, and part replacements) performed on a fixed schedule to keep equipment running and catch wear before it becomes a breakdown. Each line names the asset, the task, its frequency (daily, weekly, monthly, quarterly, or annual), the spec or tolerance to check, and who signs it off. Unlike a repair work order, which reacts to a failure that already happened, the checklist is planned upkeep you control.
Key Takeaways
- A preventive maintenance checklist groups tasks by frequency (daily, weekly, monthly, quarterly, and annual) so each one lands with the right person at the right interval.
- Every line needs six things: the asset, the task, the frequency, the spec or tolerance, the safety step (lockout/tagout), and a sign-off. A task without a tolerance is an opinion, not a check.
- Daily checks belong to the operator and take minutes; deeper teardown work belongs to a technician on a monthly, quarterly, or annual cadence.
- Build the list from your asset register and the OEM manual, set intervals by usage and criticality, then measure PM compliance so the checklist improves instead of rotting.
- Paper or a spreadsheet is fine to start. Move to a CMMS once you need meter-based triggers, checklists attached to work orders, and proof the work got done.
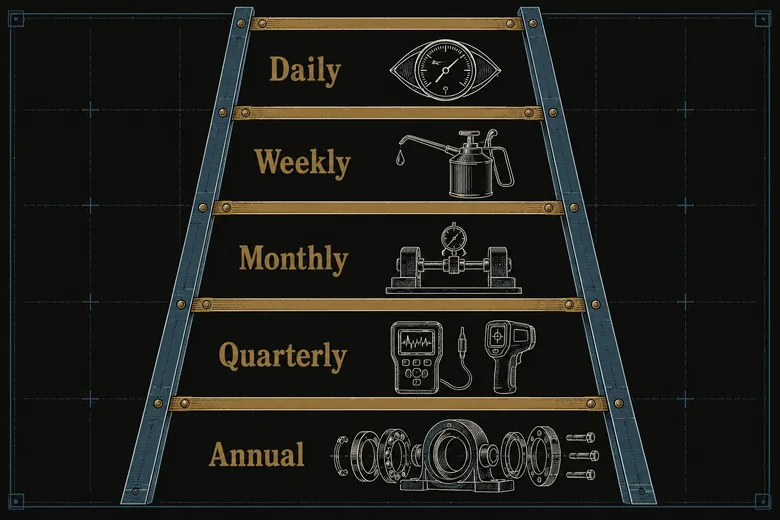
Here is the whole checklist at a glance, one row per frequency tier. The sections below fill in the actual tasks for each.
| Frequency tier | Typical interval | What it checks | Who does it |
|---|---|---|---|
| Daily | Every shift or start-up | Leaks, noise, gauges, guards, cleanliness, safety devices | Machine operator |
| Weekly | 7 days / ~40 run-hours | Lubrication, belt tension, filters, fluid levels, fasteners | Operator or junior tech |
| Monthly | ~30 days / ~160 run-hours | Alignment, calibration, electrical connections, wear parts | Maintenance technician |
| Quarterly | 90 days | Deeper inspection, vibration and thermal checks, seals, valves | Technician or specialist |
| Annual | Yearly / planned shutdown | Overhaul, bearing and seal replacement, full calibration, safety certification | Technician + OEM or contractor |
What is a preventive maintenance checklist?
A preventive maintenance checklist is a written list of the inspection, cleaning, lubrication, and replacement tasks a specific asset needs, with each task tied to how often it’s due and who is responsible. It turns “keep the machine running” into named steps a technician can follow the same way every time, so routine wear gets handled on a schedule instead of discovered during a breakdown.
The format matters more than most teams think. A good checklist line is not “check the motor.” It’s “check motor bearing temperature, record °F, flag if above 180°F.” The difference is a tolerance: the number that tells the technician whether what they’re looking at is fine or a problem. A check that catches a failing bearing before it seizes is the difference between a five-minute planned stop and an hour of unplanned downtime that drags your OEE down with it. Skip the tolerance and the checklist becomes a box-ticking ritual that catches nothing.
What goes on a preventive maintenance checklist
Whatever the asset, every strong checklist line carries the same set of elements. Fiix and most reliability frameworks land on a similar list, and these are the ones that survive contact with a real shift:
- Asset ID: the exact machine, line, or location, not a vague category.
- Task: one specific action: inspect, clean, lubricate, tighten, calibrate, or replace.
- Frequency: daily, weekly, monthly, quarterly, or annual, or a usage trigger like run-hours or cycles.
- Spec or tolerance: the acceptable range, torque value, pressure, or reading to check against.
- Safety step: the lockout/tagout (LOTO) or PPE requirement before the task starts.
- Parts and tools: the filter, belt, grease type, or gauge the task needs staged in advance.
- Sign-off: who did it, the date, and the reading, so the record proves the work.
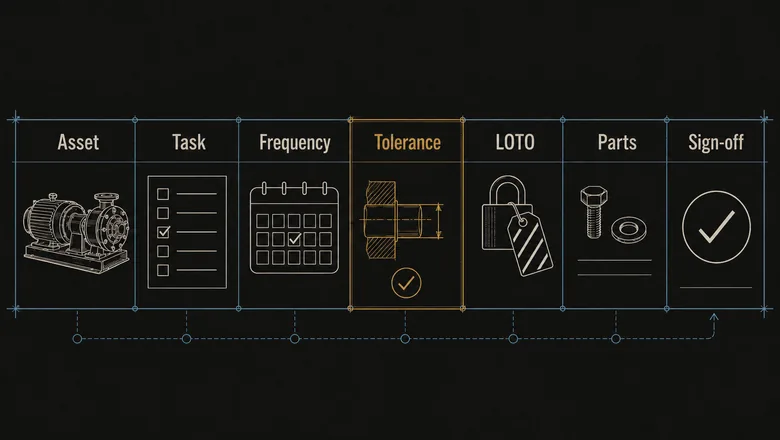
Miss any of these and the task gets weaker. Drop the tolerance and you can’t tell pass from fail. Drop the sign-off and you can’t prove compliance to an auditor or to yourself. Those seven fields are also what makes the checklist portable to software later, because a CMMS wants exactly this structure per task.
The preventive maintenance checklist, by frequency
The most usable way to organize a preventive maintenance checklist is by frequency: group every task by how often it runs, from daily operator checks to an annual shutdown overhaul. Frequency is the field that decides who does the task and when, so it’s the natural spine for the whole list. Here is a general-equipment master checklist you can adapt per asset.
| Task | Frequency | Notes |
|---|---|---|
| Walkaround for leaks, odd noise, and vibration | Daily | Operator, start of shift; report anything abnormal before running |
| Check gauges, pressures, and temperatures against normal range | Daily | Record readings; flag out-of-range values |
| Confirm guards, E-stops, and safety interlocks work | Daily | Never run with a bypassed safety device |
| Clean work area, remove swarf and debris, wipe down | Daily | Contamination hides leaks and wear |
| Lubricate points per the lube chart | Weekly | Right grease or oil type and quantity; over-greasing damages seals |
| Check and top up fluid levels (coolant, hydraulic, oil) | Weekly | Investigate any level that keeps dropping |
| Inspect belts, chains, and hoses for tension and wear | Weekly | Replace before failure, not after |
| Clean or replace air and intake filters | Monthly | Restricted airflow overheats motors and drives |
| Check alignment, backlash, and fastener torque | Monthly | Use the OEM torque spec; log the values |
| Inspect and tighten electrical connections; check for heat | Monthly | LOTO first; thermal scan on panels |
| Test calibration on gauges, sensors, and safety devices | Quarterly | Recalibrate to spec; document results |
| Vibration and thermal inspection on motors and bearings | Quarterly | Trend the readings to catch developing faults |
| Inspect seals, gaskets, and valves; replace wear parts | Quarterly | Stage parts from spares in advance |
| Full teardown, bearing and seal replacement, overhaul | Annual | Plan into a shutdown; use the OEM kit |
| Complete safety and compliance certification | Annual | Pressure vessels, lifting gear, electrical per local code |
Daily preventive maintenance checklist
Daily checks are the operator’s job, and they should take five to ten minutes at the start of a shift. The point isn’t deep maintenance; it’s early warning. An operator who runs the same machine every day feels a new vibration or hears a bearing starting to go long before a monthly inspection would catch it. This is the heart of total productive maintenance, where the people closest to the equipment own its basic care and small problems get caught before they turn into the downtime and defects that lean treats as pure waste.
Keep the daily list short. If it takes longer than the shift handover, operators will skip it, and a skipped check is worse than no check because it still gets signed. Leaks, noise, gauges, guards, and cleanliness cover most of the value.
Weekly and monthly preventive maintenance checklist
Weekly and monthly tasks move from watching to touching. Weekly work is lubrication, fluid levels, and the belt or filter checks that a junior technician or a trained operator can handle. Monthly work is where a maintenance technician gets involved: alignment, torque, calibration, and electrical connections that need tools, specs, and usually a lockout. Group the weekly items so they can be done in one pass rather than scattered across the week.
Quarterly and annual preventive maintenance checklist
Quarterly and annual tasks are the deep work you plan around production, not against it. Quarterly checks add condition monitoring (vibration, thermography, and seal and valve inspection) that trends an asset’s health over time. The annual entry is usually a planned-shutdown overhaul: bearings, seals, a full calibration, and any safety certification your equipment is legally required to pass. These are the tasks most likely to slip when the floor gets busy, which is exactly why they belong on a dated schedule with parts ordered ahead.
FREE TEMPLATE
Grab this as a fillable preventive maintenance checklist template with columns for asset, task, frequency, spec, LOTO, technician, date, and sign-off, plus a blank tab to build your own. Print it for the floor or import the columns straight into your CMMS.
How to build your own preventive maintenance checklist
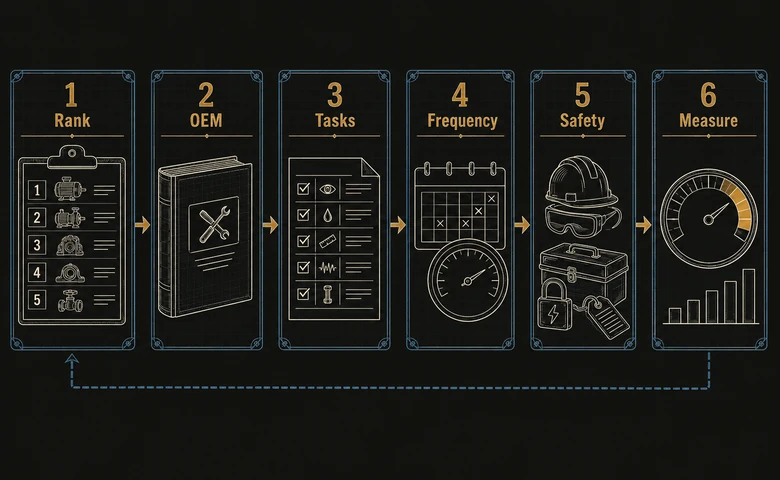
To build a preventive maintenance checklist, start from your asset list and the manufacturer’s manual, not from a generic template you found online. A borrowed checklist covers a machine that isn’t yours, at intervals set for someone else’s duty cycle. The six steps below turn your equipment into a checklist that actually fits it.
Workflow · about 1 hour per asset
How to build a preventive maintenance checklist
Turn one asset and its manual into a running preventive maintenance checklist with the right tasks, intervals, and sign-off.
Inventory and rank your assets by criticality
List every asset in a register, then rank each one by what its failure costs in downtime and safety. Build checklists for the critical few first, not all of them at once.
Pull the manufacturer’s service intervals
Open the OEM manual for each critical asset and copy its recommended tasks and intervals. The manual is your starting spec; adjust it later from how the asset actually runs.
List the tasks and add a tolerance to each
Write each task as one action with a measurable pass or fail: a torque value, pressure range, or temperature limit. A task with no tolerance can’t be checked, only guessed.
Set each task’s frequency
Assign a frequency by time or by usage. Use calendar intervals for steady-duty assets and run-hours or cycle counts for anything that runs unevenly.
Add safety, parts, and sign-off
For each task, note the lockout/tagout or PPE step, the parts and tools to stage, and a sign-off field. Staging the right spare is what lets the task close on time.
Assign, schedule, and measure compliance
Assign each task to a role, put it on a schedule, and track PM compliance, the share of scheduled tasks completed on time. Use that number to trim or tighten the list.
Two of those steps quietly decide whether the checklist survives. Staging parts in step five means the spare is on the shelf when the task comes due, which is a job for the MRO inventory system that tracks maintenance spares separately from production stock. Measuring compliance in step six is what turns a static list into something that improves: review the misses in a short kaizen event, then trim the tasks that never find anything and tighten the ones that keep catching failures.
How to set preventive maintenance frequency
Set preventive maintenance frequency from three inputs: the manufacturer’s interval, how hard the asset is used, and what its failure costs. The OEM interval is the floor; usage and criticality pull it tighter or looser from there. Getting frequency wrong in either direction is expensive: too rare and you miss failures, too often and you waste labor and replace parts that still had life.
- Run a task daily when its failure is sudden or dangerous, or when a quick look catches a fast-developing problem: leaks, safety devices, and abnormal readings.
- Run it weekly or monthly when wear is steady and predictable: lubrication, filters, belts, alignment, and calibration on standard production equipment.
- Run it quarterly or annually when the task is deep, disruptive, or tied to a shutdown: overhauls, bearing replacement, and compliance certification.
- Switch from time to usage when an asset runs unevenly. A machine at 20 hours one week and 60 the next should trigger on run-hours or cycles, not the calendar.
- Tighten the interval on your most critical assets and loosen it on the ones whose failure nobody would notice. Not every machine deserves the same cadence.
Two rules help you sanity-check an interval. The first is the OEM manual, which sets the baseline and usually keeps a warranty valid. The second is the reliability world’s “10% rule”: a preventive task should be completed within plus or minus 10% of its scheduled interval to count as done on time, so a 30-day task done between day 27 and day 33 stays compliant. Wander outside that window regularly and you aren’t really running a schedule.
Frequency is also where preventive maintenance meets its limit. A fixed interval can’t see a random failure that develops between two visits, which is the case for putting sensors on your most critical assets and letting condition data set the timing instead. That trade-off between a calendar and a sensor is the whole argument between preventive and predictive maintenance, and it decides which assets stay on a checklist and which graduate to monitoring.
A preventive maintenance checklist example
Here is a preventive maintenance checklist example for a rotary-screw air compressor, one of the most common and most neglected assets on a plant floor. It shows how the general master list above turns into specific tasks, tolerances, and intervals for one machine. Use it as a pattern for any equipment maintenance checklist you build.
| Task | Frequency | Spec / tolerance |
|---|---|---|
| Drain condensate from the receiver tank | Daily | No standing water; auto-drain working |
| Check operating temperature and pressure | Daily | Within OEM range; discharge temp below limit |
| Listen for air leaks at fittings and hoses | Daily | No audible leaks; fix on discovery |
| Check and clean the air intake filter | Weekly | Replace if restricted; note the pressure drop |
| Inspect and top up compressor oil | Weekly | Level in the sight glass; correct grade |
| Check belt tension and condition | Monthly | OEM deflection spec; no cracks or glazing |
| Replace oil filter and separator element | Quarterly | Per run-hours or the OEM interval |
| Change compressor oil | Annual or by run-hours | OEM oil and interval; sample if trending |
| Inspect motor bearings and electricals | Annual | LOTO; thermal and vibration check |
Notice what changed from the generic list: every task now has a number or a clear pass or fail, and the intervals split between calendar and run-hours because a compressor’s wear tracks how much air it makes, not how many days pass. That’s the level of specificity a checklist needs to actually prevent failures rather than just document them.
Where preventive maintenance checklists fail
Preventive maintenance checklists fail for a predictable reason: the list gets written once, then never gets run, reviewed, or trimmed. The strategy looks fine on paper and dies in execution. MaintainX’s 2026 State of Industrial Maintenance report found 71% of teams name preventive maintenance as their main strategy, yet half still spend under 40% of their time on planned work. Most plants are more reactive than they believe.
Three failure modes cause most of it. The first is checklist theater: technicians sign off tasks they didn’t really do because the list is too long, too vague, or has no tolerance to check against. The second is the frozen list: a checklist written five years ago that still schedules a task for a machine you retired and never added the one that keeps breaking. The third is no feedback loop: nobody looks at which checks actually catch failures, so the list never gets smarter.
The fix is the same in every case. Keep the list short enough to run, put a real tolerance on every line so a sign-off means something, and review PM compliance on a regular cadence so the checklist earns its place. A checklist is a living document or it’s wallpaper.
Run your checklist in software when paper stops scaling
A checklist on paper or in a spreadsheet works to start, but it can’t remind you it’s due, trigger on a meter reading, or prove it was done. Once you’re running more than a handful of assets, the manual version breaks: tasks slip, records scatter, and compliance becomes a guess. That’s the point to move the same checklist into software.
A computerized maintenance management system schedules each task, attaches the checklist to a work order, triggers PMs by date or meter, and logs every sign-off, which is what turns compliance from a hope into a number. If you’re weighing that step, our guide to choosing a CMMS for a manufacturing plant compares the platforms by shop size and budget.
You don’t always need the full system, though. A lighter tool focused only on scheduling the upkeep can be enough for a smaller shop, which is the case laid out in our breakdown of what dedicated preventive maintenance software does and when it’s worth it. Either way, the checklist you built above is the content that goes inside the software; the tool just runs it for you.
Frequently Asked Questions
A PM checklist, short for preventive maintenance checklist, is a standardized list of the routine tasks an asset needs on a set schedule to prevent breakdowns. It names each task, how often it’s due, the spec to check against, and who signs it off, so maintenance happens on a cadence instead of only after something fails.
A preventive maintenance checklist should carry seven things per line: the asset, the specific task, its frequency, a spec or tolerance to check against, the safety step such as lockout/tagout, the parts and tools needed, and a sign-off with the date and reading. The tolerance and the sign-off are the two fields most often skipped and the two that matter most.
The four types are time-based (serviced on a calendar interval), usage-based (serviced after set run-hours or cycles), failure-finding (scheduled tests of standby safety devices), and risk- or condition-based (timing tuned to criticality or a measured signal). Most plants run a blend, matching the type to how each asset wears and what its failure costs.
A daily PM checklist is short, operator-run, and about early warning: leaks, noise, gauges, guards, and cleanliness checked in a few minutes at shift start. A monthly PM checklist is deeper and technician-run: alignment, calibration, electrical connections, and wear-part inspection that need tools, specs, and usually a lockout. Daily catches surprises; monthly prevents wear.
Preventive maintenance frequency comes from the manufacturer’s interval, adjusted for how hard the asset runs and what its failure costs. The reliability field’s 10% rule is the common yardstick for on-time completion: a scheduled task should be done within plus or minus 10% of its interval, so a 30-day PM done between day 27 and day 33 counts as compliant.